

Bassoon Maintenance Guide: How to Care for Your Bassoon Year-Round

How many of us are guilty of playing our bassoon day in and day out and putting it away quickly without much thought? 🙈
The bassoon is such a complex instrument. It has dozens of keys, springs, screws, pads, and other bits that all have to work together. Routine maintenance is essential to an enjoyable playing experience.
Get a free bassoon maintenance checklist below!
🧹 Every Time You Play - Bassoon Cleaning Tips
Good daily habits help you avoid major repairs and headaches later on. Make these tasks part of your packing up routine, and your bassoon will thank you!
Dry & Store Your Bassoon Reed
While the reed isn’t technically part of the bassoon, reed care is still important! Blow through the butt end of the reed (turban) through the blades to expel water (a nice word for spit). If needed, wipe it on a clean cloth if needed to remove extra moisture. Store in a well-ventilated reed case.
Blow the Water Out of Your Bocal
Blow through the cork end of your bocal to push the water through the smaller end. Handle it carefully and avoid dinging the tip. Store the bocal securely in your case.
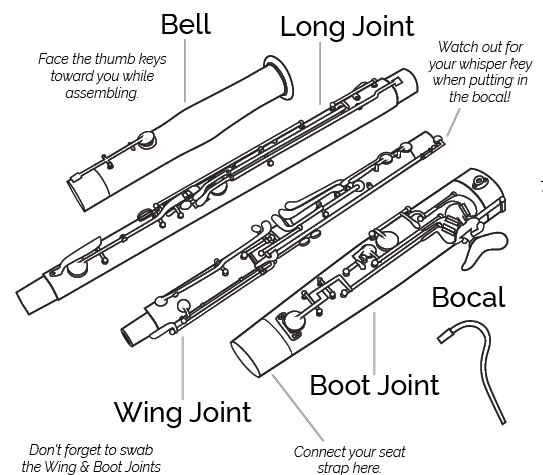
Swab the Boot Joint & Wing Joint - Every Time
Use the right swab. I prefer to use a single silk swab to clean my bassoon. It works well for both joints, is easy to wash, and doesn’t get tangled or stuck as much as bulky cotton swabs. I also like swabs with a chain rather than a weight. I think they’re a little easier to pull through the boot joint. Skip the old-school stick swabs. They don’t properly draw the moisture out of the bassoon and can leave lint and dust behind.
Swab the boot & wing joints. Starting with the boot joint, pour the excess water out of the SMALLER side. Drop a silk bassoon swab in the larger hole. Turn the boot joint over to get the chain through the u-bend, and pull it through the smaller hole. It’s important to go from the large side (which is dry) to the small side (which is wet). You should only need to do this once. The boot joint is the most prone to water damage and sticky pads, so don’t skip this step! Then, put the swab in the larger end of the wing joint and pull through the smaller side where the bocal goes.
Helpful reminder: we always want to go from big to small when cleaning the bassoon.
Ok, so I can hear some of you thinking, “Do I REALLY need to swab my bassoon EVERY time? What if I only played for a few minutes?”…YES, you really do need to swab every time!
Moisture damages both wood and plastic bassoons. It can ruin pads, gunk up tone holes, and rot wood. Yuck! Swabbing every time you play is essential. Protect your bassoon long-term and avoid expensive repairs!
The MOST important thing you can do to protect your bassoon is swab out moisture every time you play. The more you swab, the faster and more efficient you’ll get 😉 If you’re in a pinch, swab your bassoon later as soon as possible.
Wipe Keys and Wood with a Cloth - If Needed
Wipe the keys and wood with a microfiber cleaning cloth before you put the bassoon in its case. If your bassoon tarnishes a lot or you worry about sweat and oils staying on the bassoon, this will help.
Store Your Bassoon Carefully
Place your bassoon back in the case. Make sure the joints line up in the case correctly. The keys should all face upwards with nothing resting or pressing on them. If your wing and tenor joints rub together, place a soft cloth between them for protection. If your A-flat pad on the boot joint sticks a lot, store it with a piece of cigarette paper under the pad.
📃 Prefer a handy checklist?
Here is a bassoon maintenance checklist with the essential daily, quarterly, and annual bassoon maintenance tasks.
🧰 Quarterly or monthly- Easy Bassoon Maintenance
If you are a serious bassoon player, complete these tasks to ensure that your bassoon plays quietly, smoothly, and effortlessly in auditions and performances.
Proactive maintenance prevents annoying key noises, cracking notes, resistance, and intonation problems. Keep your bassoon in top playing shape and enhance your bassoon’s longevity with regular maintenance.
Complete these items quarterly or monthly, depending on how much you play and what you think is best for your instrument.
Clean Your Bocal
The bocal is a thin metal pipe that connects the bassoon reed to the wing joint. As you might imagine, blowing through it constantly means it can get pretty gross. Thankfully, bocals are super easy to clean!
Use warm (not hot!) water and dish soap to rinse the inside of the bocal. Then pull a bocal brush through from the large end to the small end and rinse with water again. Repeat until the water runs clear. I don’t recommend bocal swabs as they are more likely to rip or get stuck.
Pat cork dry with a towel (it’s ok if it gets wet, just pat it dry). And blow the excess water out of the bocal.
Optional: make sure the bocal nib isn’t clogged. Cover the small end of the bocal with a finger and blow into the cork end. You should hear air coming out of the tiny nib on the side. If you don’t, or it seems clogged, take a piece of reed wire or a thin paper clip and clean out the hole. Never put anything large in the nib hole or clean it aggressively. This may permanently damage the bocal.
Wash or Replace Your Swab
This one is easy to forget, but your swab needs cleaning too! Grime and dust can build up over time, and you do not want to put that into your bassoon.
Tie your swab up in a sock (or put it in a small mesh laundry bag) and wash it with your laundry every month or so. Then let it air dry completely before placing back in your case.
If your swab is torn, knotted, or otherwise damaged, throw it away and buy a new one!
Dust the Exterior of the Bassoon
Take a small, soft paintbrush and dust around the keys. Dirt, dust, and even hair can get trapped in the bassoon springs and keys. If you see excess key oil or grease, use a q-tip or pipe cleaner to wipe it up. I also like to use a few bursts of compressed air to clear dust from tight spaces.
Check That Joints & Bocal Fit
Assemble your bassoon and check that the joints fit together well. Insert joints fully (a small gap is ok) and check that they hold together well. The fit will change depending on the season. Temperature and humidity affect the bassoon quite a bit. your bassoon may not fit together perfectly all the time. That’s ok! Don’t force the pieces together. There may be a tiny gap between joints when it is hot or humid, so they may not go all the way in.
For cork joints: See a professional bassoon technician if the cork is too large and the joints barely squeeze in. They will adjust or replace the cork for a perfect fit. If the joints are too loose, wrap them with waxed dental floss until they fit.
For string joints: add or remove tenon wrapping string (size 30 red cotton string) or waxed dental floss to ensure a perfect fit.
For the bocal: If the cork is squeaky, add cork grease. Don’t let your bocal cork dry out! Your bocal can crack from the strain of the cork or the strain of inserting the bocal. If the bocal is loose, wrap it with waxed dental floss or plumbers tape until it fits.
Lubricate the Joints - Both Cork & String Wrappings
For cork joints: apply a small amount of cork grease and rub it in. Use less than you think you need! Using too much can make the joints gummy and even more sticky.
For string joints: use paraffin wax. Warm paraffin wax over a flame. Once soft, apply it to the string. Start with a little and add more only if needed. Test the fit of the joints as you go.
Lubricate Key Connections
It’s easy to overdo this, so be careful here! I don’t recommend removing the keys unless you’re an expert. Instead, is use a tiny drop of synthetic oil right at the connection of each key. Work the key up and down a few times to distribute the oil. Use a pipe cleaner or q-tip to remove all excess oil from the posts and body of the instrument. You may also oil the rollers and wipe away the excess.
Polish the Metal
Most bassoon keys have a silver or nickel plating. The best way to polish your bassoon is with a polishing cloth. Rub the cloth over each metal part until it is shiny. Polish the metal bands, boot cap, keys, rods, guards, and pad cups to remove tarnish. Polishing cloths cannot be washed, so replace them regularly. Do not use a metal polishing cloth on the wood of your bassoon.
For heavy tarnish, apply the tiniest amount ofSimichrome Polish with a clean, soft cloth or Q-tip. The metal plating is very thin, so use sparingly and wipe off all polish. Avoid getting any polishing cream on your key posts, screws, pads, and springs.
Check the Whisper Key & Bocal Connection
Assemble your bassoon and press the whisper key.
Check that the whisper key pad is intact and covers the nib on the bocal.
Then press the pancake key and make sure the whisper key pad touches the bocal nib. If it doesn’t close, check your wing and boot joint alignment. Or bend the whisper key/pancake bridge carefully with a pair of smooth pliers if the whisper key or pancake isn’t closing. The metal can weaken, so take things VERY slowly. Make tiny adjustments and check your work as you go.
Bend the bridge down toward the instrument for more closure of the whisper key.
Bend it away from the instrument for more closure of the E pancake key.
🗓 Once a Year - Annual Bassoon Maintenance
To keep your bassoon in top shape for many years, follow these tips for deep cleaning and maintaining your bassoon.
💪🏼 Do-It-Yourself Annual Bassoon Maintenance
I don’t recommend taking off any bassoon keys or removing the u-bend yourself unless you are a professional or under the supervision of a professional bassoon technician. But almost anyone can complete these cleaning and maintenance tasks!
Deep Cleaning the Bassoon
Dive deeper with these guides on emergency bassoon repair at home and diagnosing problems with your bassoon.
Clean inside the open tone holes. Take a Q-tip and clean the inside of all the open tone holes (EDCBA). Dust and grime can build up in the tone holes.
Wipe & shine the body of the bassoon.
For plastic bassoons: dampen a clean cloth and wipe down each joint, avoiding all pads and metal parts.
For wooden bassoons: apply a few tiny drops of light mineral oil to a cloth before wiping the wood. When using mineral oil, follow up with another clean, dry cloth wipe to remove any hint of oil which can attract dust or build up in the keyword. Do not let any oil get anywhere near the pads!
Clean around the key posts using a Q-tip. Sometimes you’ll see some grease build up and trap dirt around the keys. Wipe the oil or grease away.
Remove everything from your case and vacuum the inside to remove any dust, reed shavings, and pet hair. These can gunk up your keys, slow down mechanisms, and cause pads to leak.
Annual Bassoon Maintenance Check
Visually inspect each piece of the bassoon from smallest to largest. Check for loose pads, broken corks, missing or loose screws, misplaced springs, bent rods, and keys. Tighten loose screws and put springs back into place. A bassoon technician should perform all other work.
Check the wing and boot joints for suction. Take the wing joint and plug the smaller end with your left hand, use your other hand to close the tone holes, and suck in through the larger end. It should hold a vacuum, and you shouldn’t hear any hissing or leaking noises. Repeat this process to check the seal on the Boot Joint.
Check the bocal for suction and look for visible cracks, dents, and damage to the outside, especially the bocal tip.
Assemble the bassoon and wiggle each key to ensure they open and close correctly and quietly. For loud key noises, check the screws and tighten if they are loose. Or oil the key mechanism.
If anything is bent, broken, or missing - make a note of it and take it to a repair shop!
🚫 Don’t Try This at Home - Professional Bassoon Maintenance
It takes a lot of skill to correctly remove and replace the keys on the bassoon. There are a lot of tiny screws, overlapping pieces, and springs to keep in place, and the key work is quite fragile. Avoid damaging your bassoon or breaking something, and leave it to the pros!
These are the tasks that it is best to leave to the professionals.
Removing and lubricating the keys
Removing the u-bend for cleaning or recorking
Cleaning covered tone holes
Cleaning the pad surfaces
Oiling the bore of the instrument
Replacing felts, corks, and pads
Replating keys and repairing or refinishing wood
Replacing broken springs, keys, or posts
⚠ Annual service by a professional bassoon repair technician is vital to maintaining your instrument and ensuring effortless playing!
I was fortunate to work with the wonderful bassoon repair specialist, Carl Sawicki, for many years, and he instilled in me the importance of properly maintaining my instrument and how vital that is to perform at a very high level.
Additional recommended bassoon maintenance and repair reading:
As we all know, bassoons can be quite expensive. Routine bassoon maintenance ensures that your instrument will play beautifully for many years. Playing the bassoon is already challenging, so don’t make it more difficult by neglecting your instrument!
Keep this post bookmarked, or set a reminder for these maintenance tasks on your phone or calendar!
For those just getting started, check out the #BassoonGoals: Getting Started Workbook, which features easy exercises for beginners, a list of recommended supplies, and step-by-step bassoon care instructions.