

How to Form a Bassoon Reed Blank: My Simple 5 Step Process

I first learned how to make bassoon reeds at summer band camp in 7th grade. Despite my first reed not even making a sound, I loved learning about the process! I continued making my own reeds throughout high school and college, updating my process as I went along.
I started making reeds for my students when I became a bassoon teacher. At this point, I was making over 500 reeds per year and needed to streamline my process to make good reeds quickly and efficiently. As a result, my 5-step process is pared down compared to many bassoonists. There are many valid ways to make a bassoon reed, and every bassoonist has to find what works for them. This process suits my playing style and reed-making needs well.
There are two things that are essential to my style of reed-making.
The first is using a high-quality GSP cane to save time and energy. The second is forming the reed using the Sakakeeny-style forming pins. These are much shorter and more tapered than the average forming mandrel.
My blank-making process has a few benefits:
Great for making blanks in minimal time with a quick turnaround
It's easy to produce bassoon reeds in large quantities
The simplified process is easier to learn for new reed makers
So if bassoon reeds are so "easy" to make, why doesn't everyone do it?
Many bassoonists choose not to make reeds and prefer to buy reeds instead for these reasons:
Cane is inconsistent. Bassoon reeds use a type of bamboo-like cane called Arundo Donax. Since it is a plant material, every piece is a little different. Some pieces are too hard/soft/stringy/inconsistent and won’t make a good reed.
It takes time to get good at making reeds. Reed-making is a skill, and it requires practice. This might mean that your first few dozen reeds are terrible and not even all that playable. Most people say it takes making a few hundred reeds to get good at it.
Reed tools are expensive. We all know it can cost a lot of money to be a bassoonist. But reed tools can also be expensive, especially if you want to gouge, shape and profile your own cane.
Making reeds is time intensive. If you're already busy or need a lot of reeds, reedmaking can consume much of your time. It can be tough to find time for reedmaking in addition to practicing.
Making your own bassoon reeds can be daunting. But, with this simple 5 step process, you'll be able to craft your own reeds in no time.
What Reed Making Supplies Do You Need to Form a Bassoon Reed?
Start with Quality GSP Bassoon Cane
What is GSP cane?
GSP stands for "gouged, shaped, and profiled". This cane is already processed and ready for blank forming.
I recommend GSP cane for anyone who wants to save time and get more consistent results. While GSP cane is more expensive per piece than Gouged or Tube Cane, using GSP cane saves hours of processing time and money upfront on expensive tools. I also find that I get more usable pieces of cane when I buy GSP than I do from profiling and shaping my own. So for me, the extra cost is worth it.
Where should you buy bassoon cane?
I have been using Barton Cane for many years, and I love it. The owners, David and Julie, are delightful people who work hard to ensure that each piece of cane is high-quality and precise. I have never received a bad piece of cane from them (i.e. cracked, warped, discolored, etc.).
What I particularly love about Barton Cane is that it comes pre-scored with a well-defined collar. The standard profile is ideal in thickness for my reed-making style, which saves me a lot of time during the finishing process. Additionally, Barton Cane offers many shapes, canes, and profiles, so there are plenty of great options.
I use the Van Hoesen Shape with the standard profile in Rigotti Cane.
NOTE: If you're learning how to make reeds using my method, use the Van Hoesen shape in Rigotti from Barton Cane. This shape is ideal for the measurements I use in my forming process.
Here are some other great places to buy GSP cane: Miller Marketing, Charles Double Reed, Midwest Musical Imports, and Forrests Music. Feel free to experiment to find something you like.
6 Essential Bassoon Reed Forming Supplies
What reed-making tools will you need to form bassoon reeds with this method?
Reed Wrapping Supplies - Hot Glue Gun & Glue Sticks
Sakakeeny Van Hoesen Forming Pins/Pin Handle/Drying Rack from Nexus Woodwinds or Miller Marketing
NOTE: Using a standard long forming mandrel is not suitable for this blank-making style, as it is likely to cause cracking issues. Instead, the forming pins must have a tapered tip and a collar to limit insertion. This helps reduce the creation of cracks during forming and ensures that the tube forms correctly.
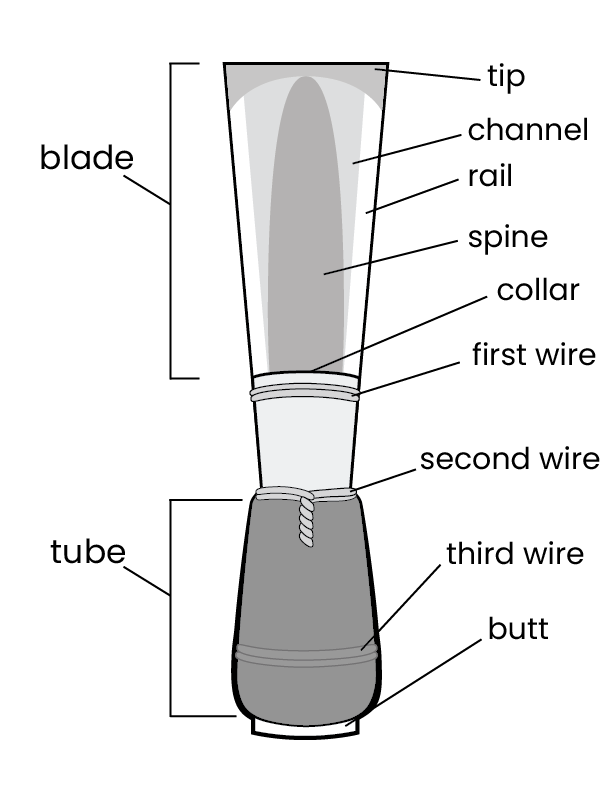
Anatomy of a Bassoon Reed
How to Form a Bassoon Reed Blank in 5 Easy Steps
So how long does it take to make a blank?
The answer will definitely vary based on your skill level and the cane you use. With this 5-step process, you can have a completed blank in 2 days, including drying time. Active reed-making time will vary from 15-45 minutes per reed on average.
The Blank-Making Process
Prepare & Soak the Bassoon Cane
Make a Mummy
Form the Reed
Finish Adding Wires
Wrap the Reed
Step 1: Prepare & Soak the Bassoon Cane

Score the Cane
Optional:
Bevel the ends of the cane
Sand the inside of the cane
Soak the cane for 2-4 hours
If you're starting with Barton Cane, skip to soaking the cane!
If not, score your cane if it isn't already. There are tons of ways to score (crosshatch, straight lines, all the way through, part of the way through) so it's up to you. I used to take a razor blade and make 6 straight lines from just below the collar to the butt of the cane. Cut most of the way but not all the way through the cane. Be careful not to split or crack the cane on accident.
If you like to bevel the cane, go for it! Beveling can help seal the tube better and provides leverage to help keep the tip open. I find that for my style it doesn't affect the outcome much either way. Some people also like to lightly sand the inside (concave side) of the GSP cane to smooth it out. If your cane feels particularly stringy or rough, I do recommend this. Use fine-grit sandpaper to lightly smooth the inside without removing a lot of cane.
To be honest...I always skip these steps! My cane comes pre-scored, and I find beveling and sanding unnecessary to produce a good result.
Once prepped to your liking, soak the cane completely in room temperature or warm water for 2-4 hours.

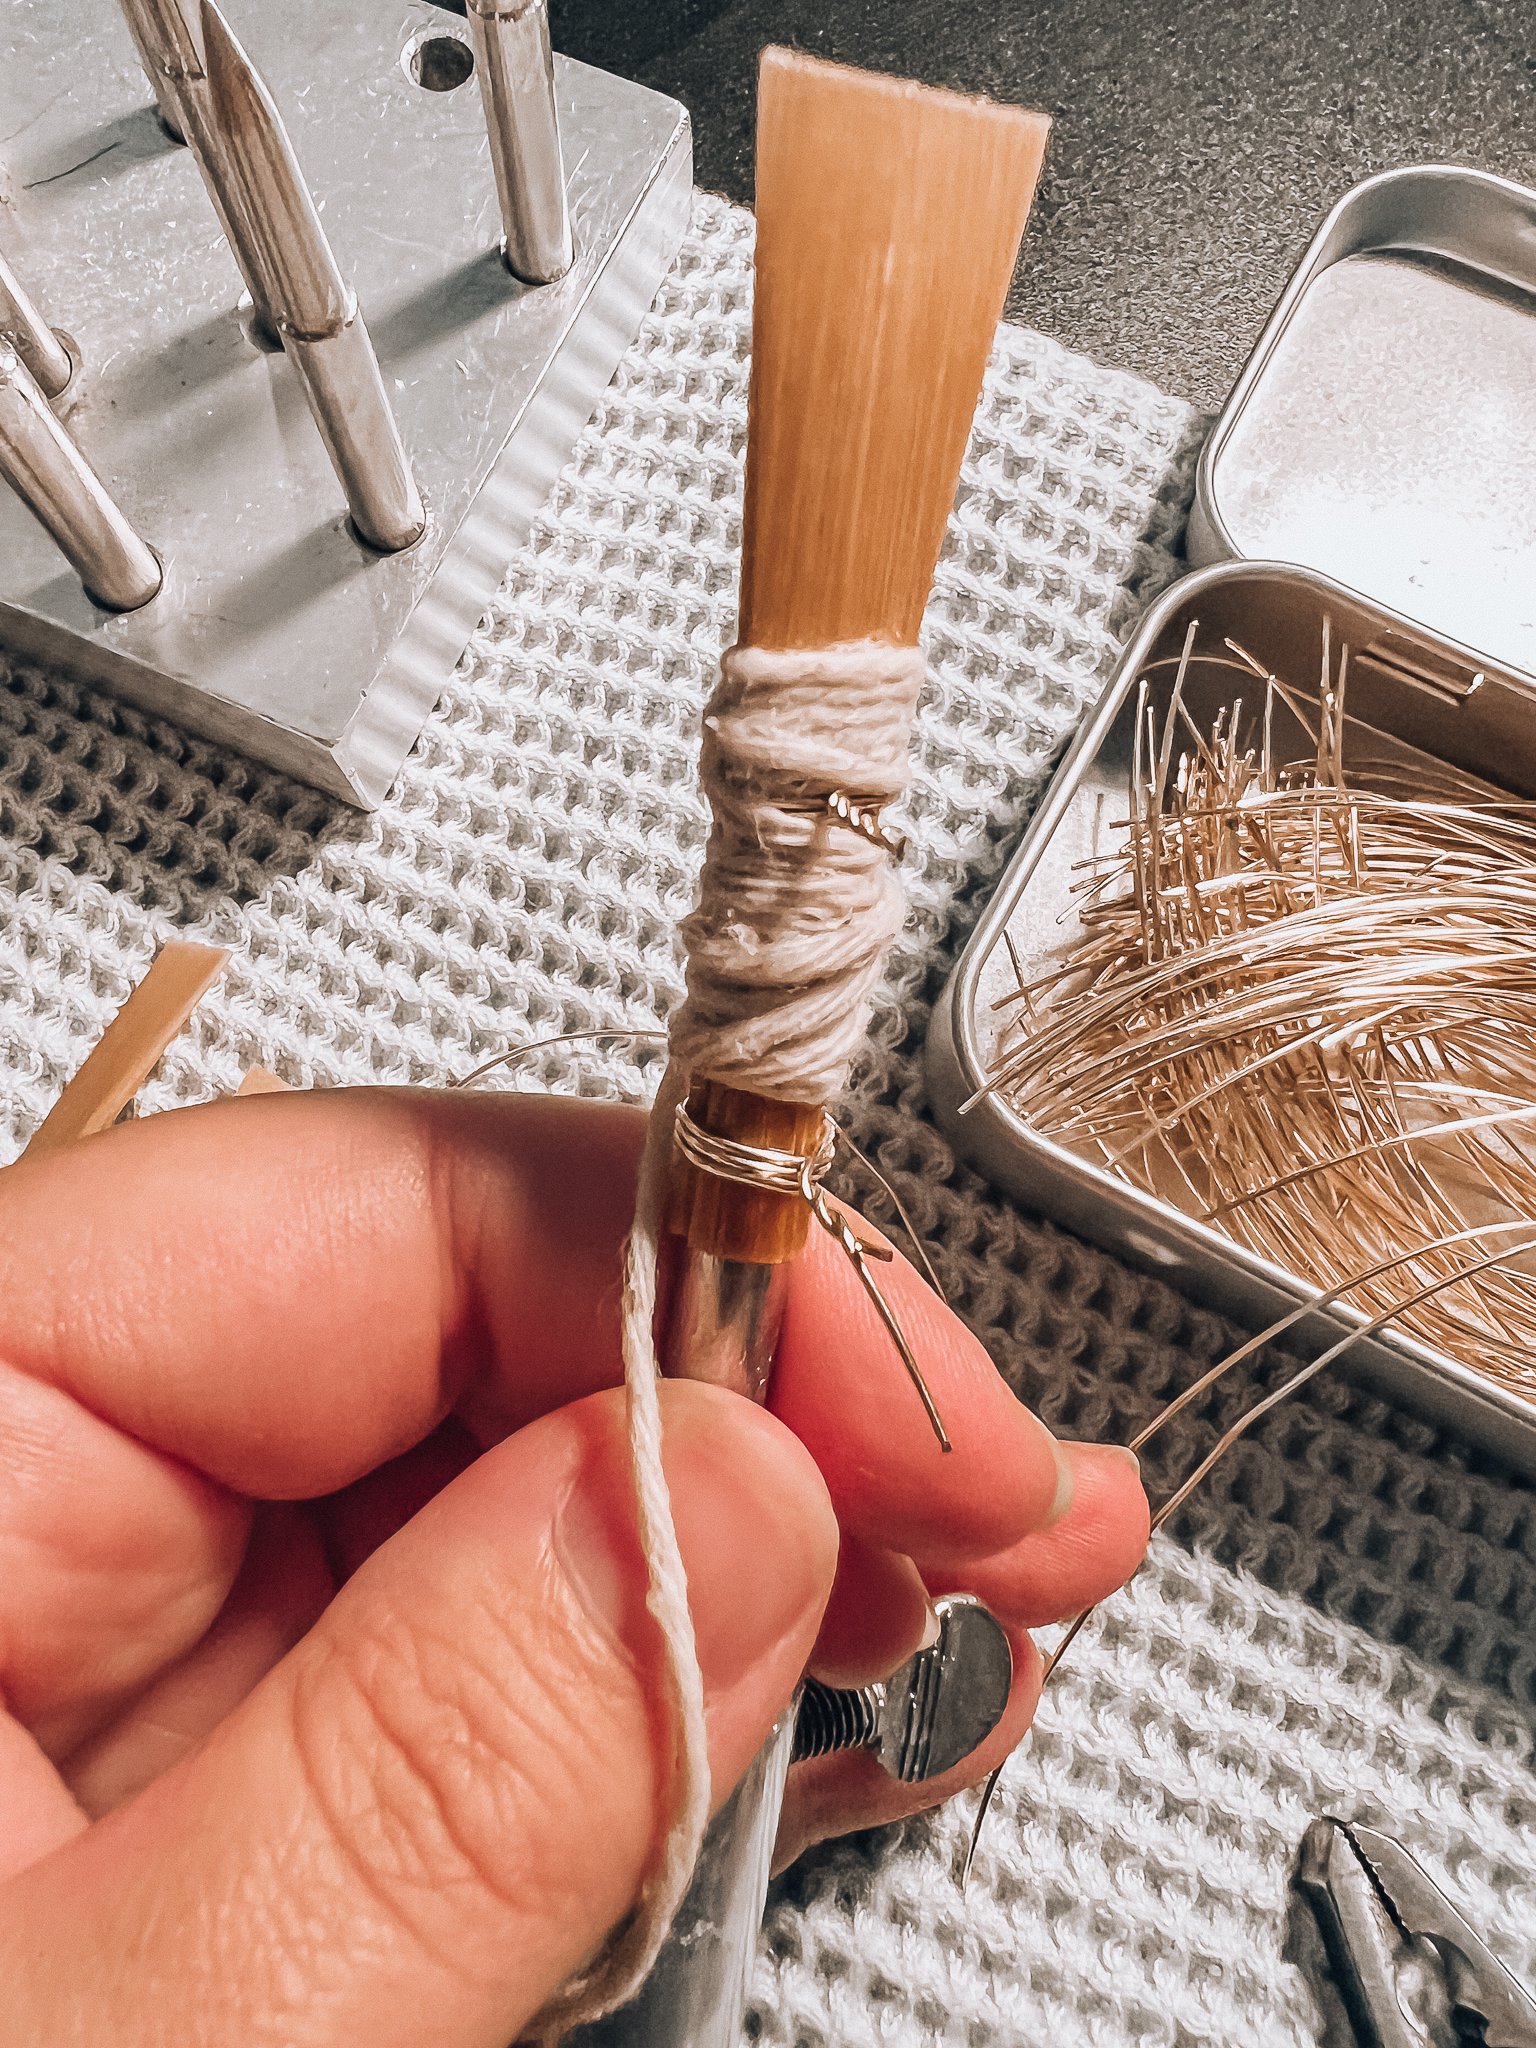
Step 2: Make a Mummy
Fold the cane and line up the sides
Place the 1st wire 25mm from the butt
Wrap in cotton kitchen twine from above the collar to the butt
Place in water
Why is it called a mummy?
You will be wrapping almost the entire unformed reed in cotton twine during forming. This supports the cane and helps it become round while forming.
After your cane has soaked for 2-4 hours, take one piece of GSP cane and carefully fold it in half and line up the sides. Cut 3 small pieces of brass wire about 4 inches long. Then place the first wire just below the collar of the reed. Wrap it around the reed before twisting the two pieces together. The wire should be about 25mm from the butt of the reed to the center of the wire. Tighten slightly using the pliers, just enough to hold it roughly in place.
Then wrap the reed with your forming string from above the collar all the way down to the butt. The string should be snug from top to bottom, especially around the collar. Place it back in the water for a minute or two. This is a great time to wrap any other pieces of cane you want to form and then move on to Step 3.

Step 3: Form the Reed
Place a forming pin in the forming handle
Insert the pin halfway into the tube of the mummy
Stop and gently tighten the 1st wire
Continue inserting the pin until the butt of the mummy reaches the ledge on the pin
Forming is the most essential step of bassoon reed blank making. Things can and do go wrong here sometimes, so go slowly and pay attention.
Many bassoonists have methods for preventing cracking during forming. These include heating the forming pins, using steam, or using hot water. I don't find those precautions necessary with my process. My reeds almost never crack during forming, thanks to the style of pins used. I also make sure to insert the forming pins slowly and without twisting side to side.
If you do notice cracks forming, they will be right around the collar area. If the crack extends too far into the blade of the reed, I would throw it away and stop working on it. Tiny cracks that don't go all the way through the cane can are probably ok. It's up to you to decide if you want to continue with a semi-cracked blank or toss it.
To form your reed, take a forming pin and insert it slowly into the tube of the mummy reed. Once you have the forming pin about halfway in, gently pull and tighten the first wire with your pliers. Don't overdo it! Just tighten a tiny bit.
Continue inserting the forming mandrel until the reed hits the ledge on the forming pin.
Step 4: Finish Adding Wires
Unwrap the bottom half of the cotton twine
Place the bottom wire 6mm from the butt of the reed
Unwrap the cotton twine completely and place the middle wire 9mm under the top wire
Using pliers, squeeze the cane below the bottom wire to help form the tube
Gently tighten the 3rd wire, then the 1st wire, then the 2nd wire
NOTE: We refer to bassoon reed wires in their order from top to bottom. (See the reed anatomy diagram)
Once the reed is on the forming pin, unwrap the bottom half of the string and place a wire 6mm from the butt of the reed. I like to triple-wrap this wire for extra stability. Unwrap the mummy string completely and place the final wire 9mm below the first wire.
Using your pliers, squeeze the cane beneath the 3rd wire to help it become rounder and form it the pin. Then tighten the 3rd wire. Check and tighten the 1st and 2nd wires slightly. Do not over-tighten! You don't want to see the wires "cinching" or pulling on the cane. They should be just snug enough to stay in place.
Allow the fully formed blank to dry on the forming pin for at least 2 days, preferably more
Step 5: Check Wires & Wrap the Reed
Dry the blank for 2+ days on the forming pin.
Check and tighten the 1st, 2nd, and 3rd wires.
Wrap your bassoon reed with hot glue, string, or other preferred methods.
When your formed reed is completely dry, check the placement of the wires with a ruler. Then tighten the wires as needed. They will probably be a little loose since the cane will shrink as it dries. When tightening the wires on a dry reed, I like to go from top to bottom. Again, don't over-tighten here. Just make sure the wires are snug, especially the third wire.
The final step of blank making is to wrap your reed! There are tons of ways to wrap a reed using everything from hot glue to string, beeswax, heat shrink wrap, and more.
I use hot glue to wrap bassoon reeds. I love how quickly it applies/dries and how comfortable it is to hold when putting the reed on the bassoon. Hot glue also wears well over time. It doesn't tend to degrade or fall apart like string turbans, which is especially great for students. If using hot glue, coat the reed from the butt to the second wire and let it dry for 5-10 minutes until cool to the touch.
Once you wrap your reed, you have a blank! You can store blanks for months in a cool, dry spot at this stage. It's a good idea to let your blanks settle for a little bit before using them if you can. But if you don't have time, you can go right into finishing and adjusting your reed.
Learning how to make bassoon reeds can be challenging. It takes a lot of practice to make good reeds consistently.
Your reed-making process should suit your playing style as well as your schedule. Many bassoonists prefer to have complete control over their reed-making process. They choose to gouge, shape, and profile everything by hand. Others want to make as many reeds as possible in as little time as possible. And some choose to forgo reed-making altogether and buy reeds from a trusted reed maker instead.
Bassoon reed-making requires a lot of experimentation and flexibility. I hope this simple 5-step forming process demystifies the blank-making process for you. Give it a try, and with practice and patience, you'll soon be able to make consistent, high-quality reeds. Happy reed making!
P.S. If you'd like to know more about the reed-making process, I highly recommend the book Making Reeds Start to Finish by George Sakakeeny which includes helpful videos and images alongside the comprehensive text.